Shaping the Terrain.
In
this
tutorial we will discuss how I create strong, light weight, realistic
terrain
on my model railroad. These discussions will include the construction
of rigid,
durable forms for hills and mountains; the creation of rock faces,
embankments,
and retaining walls; the creation of smooth or textured undulating
surfaces for
fields, lawns, forests, and so on. There are a lot of methods for doing
this, but this is the one I prefer for reasons that I hope will soon
become clear.
Before
we
begin, let’s think about the real landscape. In the real world,
the landscape
was there first. Then man altered it to create roads and railways. On
the model
railroad it is exactly the other way around: that is, the roadbed and
track
come first and the landscape is built around it. This may seem like an
obvious
point, but it is important to keep in mind as you begin to design your
own
landscape. Try to always picture how the land looked before the
railroad. Ask
your self, “what did the railroad do to traverse this mountain or
this valley?”
The answer to this questions is most often “cut and fill.”
The point is: you
don’t always build mountains that conveniently end right at
trackside. This
is highly unrealistic. Rather you build a mountain that has a narrow
cut gouged
through it to allow the railroad to travel on grade. The original
contour to
the land is still obvious to the viewer, and the effect is more
interesting and
much more realistic. The walls of this cut may be sheer rock, or more
gradual
earth embankments. They may even include man-made retaining walls.
Beyond the
cut, the mountain resumes, just as in the real world,. Likewise, to
cross a
valley you build a raised roadbed supported by fill. Again embankments,
rock
faces or retaining walls may come into play. Your small creek crosses
under this
fill in a large culvert or maybe you create a series of low wooden
trestles - much
more interesting - much more realistic.

To
further illustrate
these points, here are a few example photos taken on my Altamont and
Blue Ridge
Railway.
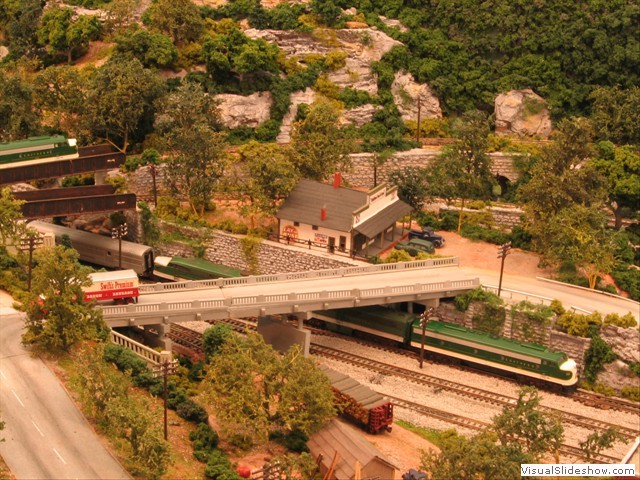
Notice that
the cuts created for roadways are not so extreme as those created
for the
railway. Cars and trucks can negotiate much steeper grades and much
sharper
curves, so roadways tend to more closely track the original shape of
the
terrain than railways do.

Another
planning note: It is good idea to avoid running all track parallel to
the edge
of the bench-work. Just a little angle and/or curve here or
there will help dispel
the
illusion that your track was created to conform to the bench-work.

Now,
with
these principles in mind, let’s do a little planning. Look at
your track plan.
Where will there be mountains, tunnels, cuts, fills? Where will it be
perfectly
flat? Where will the roads and streams run? It is good idea to sketch
out a
little topo of the entire layout. Then ask yourself how the contour of
the land
looked before the railroad was built. Is this realistic? Also at this
point it
is useful to consider if there are areas of the topo that will lie
below the
level of the bench-top. Do any of these require modifications to the
bench-work?
Below are before-and-after photos of the East River on my A&BR.
Notice how the
river bed starts at bench-top level in the back next to the wall and
slants
down below bench-top level.


Unless
you
are modeling the Bonneville Salt Flats, you should not have many large
areas that
are completely flat. The only large flat areas on the A&BR are for
the yard
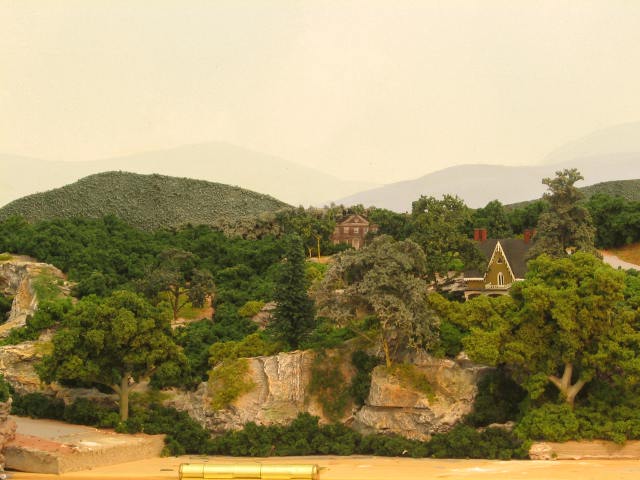
ladders at Altamont Yard and Altamont Terminal. Of course, the towns
and cities
have lots of flat space, but they are built on a series of small flat
homasote steps
cut into the rolling terrain to give the illusion of terracing. For
example, notice
the three tiers of the town of Westridge in the photo below.

Once
you are
satisfied with your topo and bench-work, go ahead and build your
roadbed and
lay and wire your track. Build roadbed runners using ¾”
plywood and homasote
traversing open bench-work and creating even grades where the mountains
and
rolling terrain will be. Cover the flat areas with ¾”
plywood topped with ½”
homasote. I’ll not get into detail here regarding the creation of
roadbed and
the laying of track for that is not the subject of this tutorial.
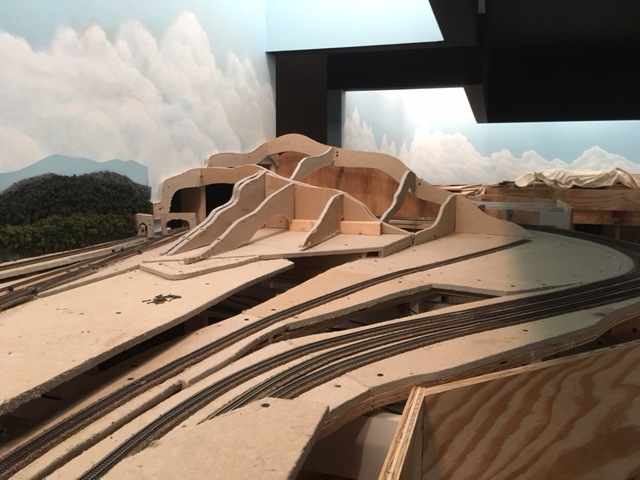
After
the
track is complete, the next order of business is to build in the
mountains and
the rolling terrain. To form a framework, I like to use homasote
cutouts fastened
together with sheet rock screws to form a grid-like skeleton. (See the
photos below.) This is then covered with plastic window
screen that
is later covered with Sculptamold. (Don’t use metal screen: it
can cause
electrical problems, and the plastic is much easier to work with all
the way
around.) This kind of rigid mountain form has many advantages. It is
very
strong and completely rigid, very light weight, clean, quick, and easy
to
build, and, to my mind, it affords the modeler more control over the
shape and
look of the finished product that most other techniques. The shape of
the
cutouts exactly determine the shape of the terrain, and building-in
rigid foam rock
faces and plaster-cast rocks and walls and other details is a snap.
Just
a note
about materials: homasote is wonderful stuff, and it can be used for a
lot more
than just roadbed. This 1/2” thick “cardboard” wall
board is primarily used for
sound deadening in wall construction, and is available at many lumber
dealers.
It comes in 4’ x 8’ sheets and is easy to cut with a
handheld jig saw or even with
a box knife. It is very strong, and yet it is soft enough to press
small nails
into it using any metal tool. Likewise, Sculptamold is amazing. It can
be mixed
thin to cover large smooth areas or mixed thick to be used almost like
clay. It
is very malleable when wet, easy to shape or carve when half dry, and
it can be
sanded when completely dry (although I don’t recommend ever
sanding or spray
painting in the train room once the track is down). It is also very
strong and
light weight; and a hard shell of this material will add unbending
strength and
rigidity to your homasote mountain forms. It also takes paint quite
well. Lastly
I use latex moulds fashioned around Chooch resin tunnel portals
and retaining
walls to mold plaster-of-paris tunnel portals and retaining walls that
are
then glued
to strategically placed homasote spanners built into the mountain
forms. For
rock faces I glue in plaster molded rock or use cut out pieces of foam
rock cut
from a rigid foam 15
x 6-1/2’' Multi-Scale Embankment
manufactured by I. S. L. E. Industries, attaching my foam rock forms to spanners in the
homasote mountain form
using yellow carpenters glue and sheet rock screws. (See photos below.)
As
to
construction, the photos below should tell the tale. You can build a
mountain
like this as a standing lift-out module or you can toe it into the wall
board
of the backdrop and the bracing of the bench-work using sheetrock
screws. I like
to keep both 1” and 2” sheetrock screws on hand and a box
of 9/16 inch flat head brads for
fastening the screen to the homasote forms. I also use
yellow
carpenter’s glue
to add additional rigidity to the homasote joints of the frame.
 |
 |
 |
 |
 Finished scene. |
 This is an illustration of a liftout pannel . The section of the roughed-in mountain frame above that is built on the homasote flat is not attacheched to the bench and can be lifted out to allow access to the track against the backdrop wall. |
Note:
There
are large mountains in all of the corners of the A&BR, and, using
this
method, I have fashioned several of these as large lift-out modules
that can be removed to
allow for cleaning and maintenance access to the tracks in the tunnels
underneath.
At
this
point, it is probably a good idea to just walk you through the terrain
creation
process from bare bench-work to finished terrain working on a small
area of the
layout. The area I have selected is above the hidden yard on a raised
section
of bench work that covers the hidden yard and attaches to the angled
hinged
access hatch above the hidden yard. Below is the bench-work before the
addition
of the hidden yard cover and hinged hatch.
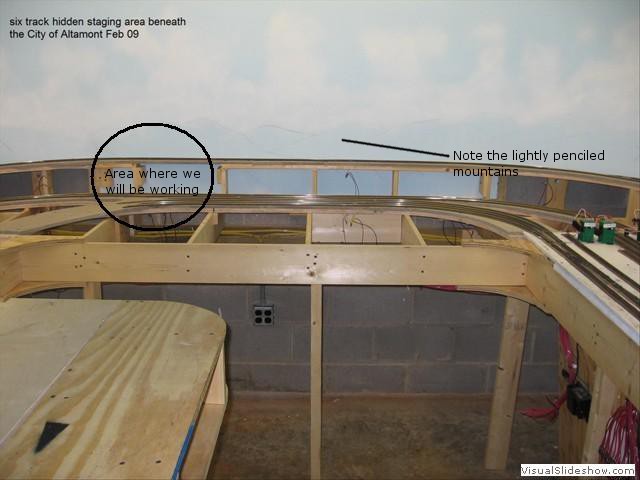
Below
you can see the complete cover and hinged top. The
circled new area
where we will be working is to be stepped mountain terraces between the
city of Altamont and
Altamont
Terminal. The bare boarded area in front of the selected area will
eventually
be more of the city, and the white area and bare gray rocks to the left
is an
incomplete section that I built earlier and plan to marry to the new
section.
The flat area to the right of the new terrain is for the future
Altamont
Cathedral. Notice I have painted in the far mountains of the backdrop.
(See my
tutorial entitled “Marrying the Backdrop to the Layout.”)

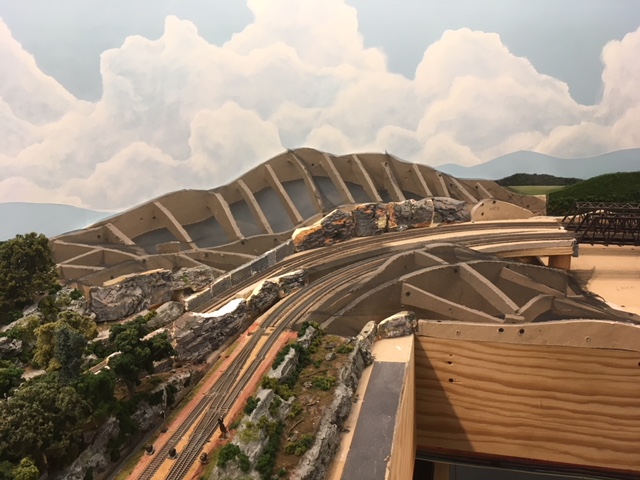
Here is the completed area with the hinged top open.

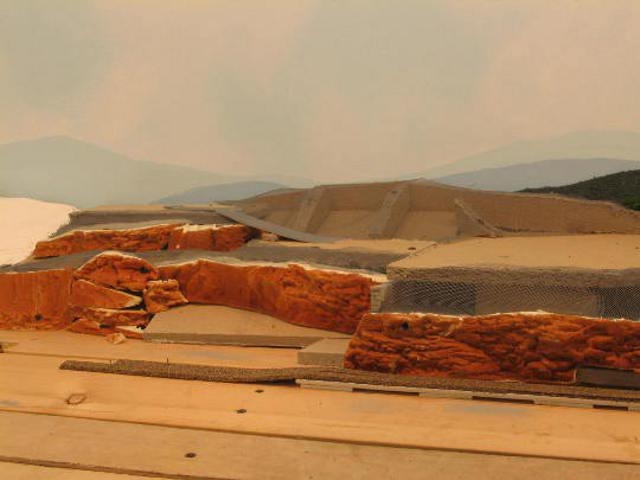
Below
you can
see a close up of the homasote mountain frame with its screen
over-covering,
and attached terraces and rock faces.
Note that roadways are also
roughed in at
this point. (For paved roads, I use .040 styrene plastic sheet cut to
size,
laminated with 220 grit sandpaper and spray painted gray.
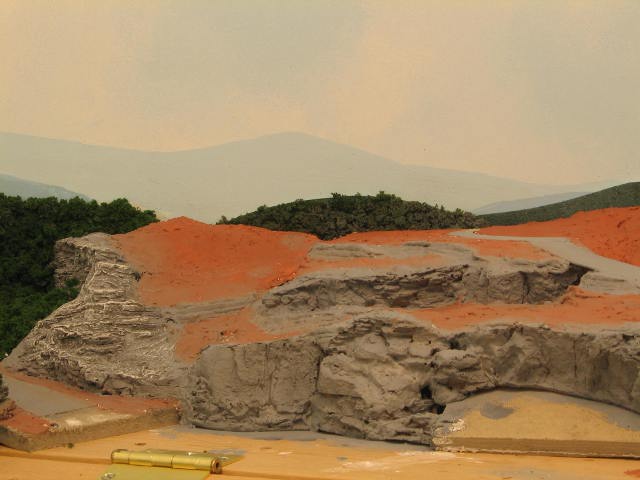
Now
it is
time for the Sculptamold. Notice I have not only covered the screen
areas, I
have also worked thick globs of the stuff in and around the roughed-in
rock
face, to tie everything together and to cover the screw heads. You can
also see
that I have carved some transitional rock forms into the Sculptamold
and
scribed them with lateral lines to simulate the strata. I have also
added some
more layers of nearer distant mountains in the form of foliage-textured
.040
styrene plastic cuts outs. (See my Tutorial entieled “Marrying
the Backdrop to
the Layout.”)

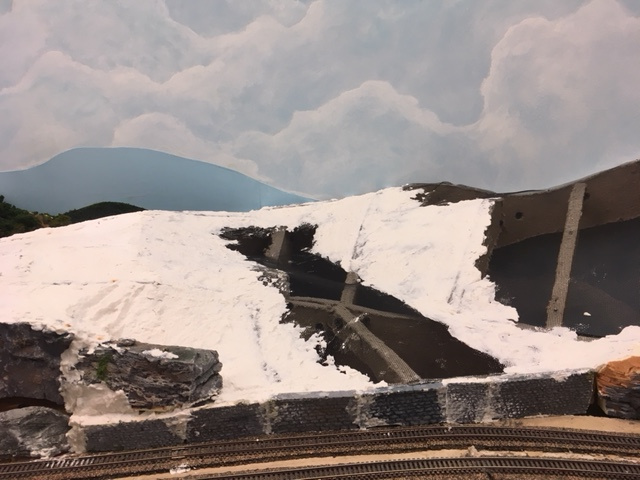
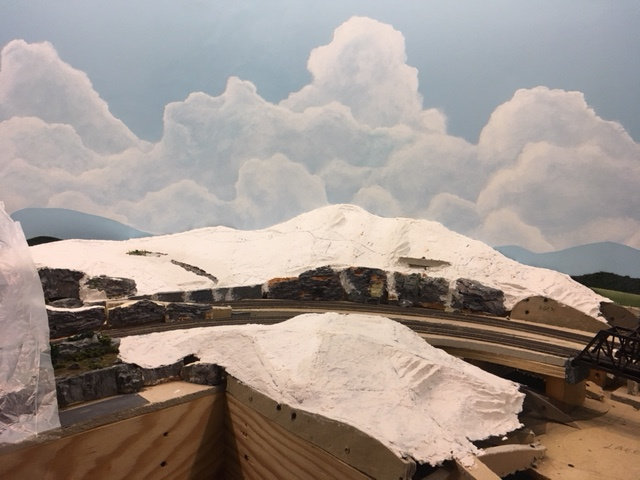
Now
let’s
rough-in a base coat of paint. I use flat latex wall paint: a medium
grey for
the basic color of the rock and a red-brown earth color for the
Southern
Appalachian earth. You might want different rock and earth colors
depending on
the area your are modeling, but remember, this is only the base, and a
lot more
coloring and darkening and texturing will come later, so the exact
color here
is not really too critical. It is a good idea to mix and keep on hand a
fairly
large amount of your base rock and earth colors to avoid having to
match these
mixed colors later.
After
the
gray on the rocks has completely dried, give the rocks a good
coat of black
wash to
get down in the crevices and darken the whole thing. I like to use
black tempera
powder mixed with rubbing alcohol. (Don’t use plain water,
it has too
much surface
tension and therefore tends to bead up. Many
use a
thinned down latex or acrylic paint or even an ink wash. You can choose
what
works best for you. Don’t worry if you make a mess. Except for
the deep cracks,
most of the black will be covered over later. Just slop it on. Work
fast so you
don’t get the gray latex flowing again. If you do that, you will
just get
darker gray solid color rocks, and you want things to look pretty
splotchy at
this point.

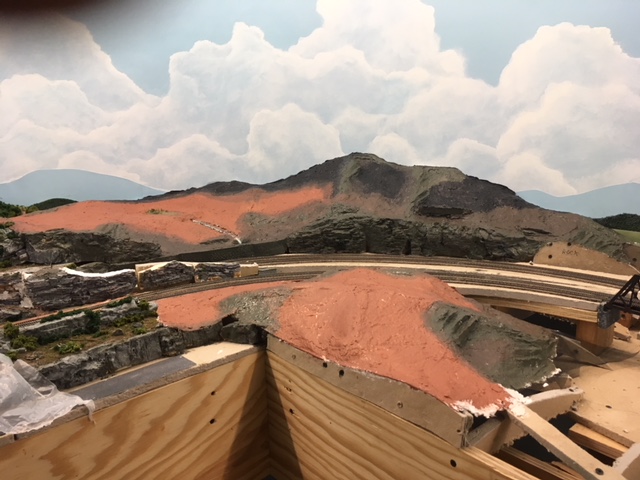
Now
let’s
put down our first texturing layer on the earthen areas. I use a
mixture of
tempera paint powder and plaster of paris sprinkled over the painted
red-brown
earth sections that have been first sprayed with rubbing alcohol.
Warning: the
dry paint powder has a tendency to get everywhere and as you later
spray over
any this, it tends to splatter, so it is good idea to mask off nearby
track, structures, and
roadways and use a handheld shield to protect rocks and foliage and
backdrop when
dusting the powder or spraying the liquid etc. This technique is a variation on Linn Westcott's famous "zip
texturing" idea popularized in the late 1960s. It is described as
follows
in
Joe Fugate’s masterful “Forum Clinic” http://siskiyou-railfan.net/e107_plugins/forum/forum_viewtopic.php?1270.10
“Be
aware that the plaster - tempera paint mix darkens quite a bit
when you wet it down, so mix up a batch that looks
too
light to you, then apply it to a scrap of scenery, wet it down and
allow it to
dry. Once it's dry, check the color. If it's too dark, add more plaster
and try
again. If it's too light, add more color and try again. Keep track of
your
formula so you can repeat it later. Generally, you want somewhere
between 2 - 8
parts plaster to color, or perhaps 10 parts plaster if you need a
really light
"dirt". Keep track of the total parts that are color. For example,
the rich brown dirt color below has 3 parts that are color, so 9 parts
plaster
is really a ratio of 3 parts plaster to 1 part color (9 divided by 3 is
3). For
reference, here's some simple formulas I use.
Rich brown
dirt:
1 part black
2 parts brown
9 parts
plaster (3:1 color to plaster)
Tan dirt:
1 part black
2 parts brown
1 part yellow
16 parts
plaster (4:1 color to plaster)
Get yourself
a tea strainer, spray wet water
(water with a few drops of detergent in it) on the bare brown scenery,
and
sprinkle some of the plaster-tempera mix onto the scenery. Then mist
the
plaster mix from above lightly with more water from a pump spray
bottle. In a
couple of hours, the plaster should be dry and set up. If it's still
loose,
spray it again.
If I want
something that looks muddy, I'll soak
the plaster good. Or if I want a more dusty look, I'll take it easy
with the
water.”
After
everything is dry, you can use your vacuum to get up any loose powder.
You may
need to touch up a few spots here and there at this point, but this is
easy –
just few pinches of the plaster paint powder and few little shots of
the
alcohol spray.
PS.
To make
my red/brown mix, I use Joe’s rich brown dirt recipe and add
small amounts
(perhaps ½ a part each?) of yellow and red until I get what I
want.
Note:
the
contrasting dark and light color soil in the photo is due to the fact
that the
sculptamold on the left was done much earlier and was complexly dry
when I put
on the zip texturing, while the newly applied sculpatamold, although it
appeared to be dry in the larger new section on the right, was still
wet enough
to absorb the alcohol spray. When this dries for a week or so, the two
will
match. Anyway, as you will see, the difference in color won’t
much matter once
the put on the rest of the ground cover.

Let
all of
this dry for a day or even two, and then dry brush the rocks with white
latex
paint. Dry brushing is an art that is critical to realistic modeling.
Dip a old
1 inch wide brush in thick flat white latex wall paint, rub the excess
off the
bristles on the lip of the paint can, wipe the bristles with a clean
rag, and then work out almost all of
remaining the paint
by rigorously and forcefully painting swirls on clean dry newspaper.
Use
several sheets, and work it until it is pretty dry and almost no paint
is left
in the bristles. Now just touch it to the rock face working very light
strokes
that touch only the highest projections of rock. Go lightly at first
and harder
as the brush become dryer and dryer. You should be able to create a
feathery
white highlighting that makes your rocks come alive. Practice a little
and you
will get the hang of it. Notice I have also begun to add clump foliage
to
create a distant forest tree line and to hide the crack between the
sections.
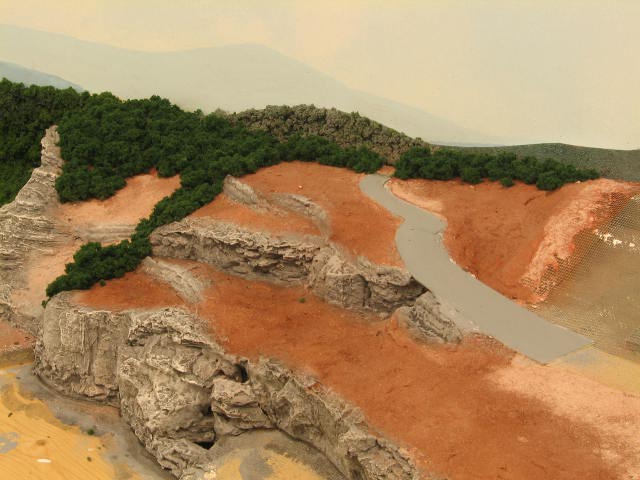
Now let’s rough-in the rest of the basic shrubbery around the rocks using several colors of clump foliage held in place with contact cement.

Now
some
grass and other ground cover. I like to use a very fine ground foam
held in
place with white glue. First, thin a little white glue with water
(about
1 part
glue to 2 or 3 parts water). You want this pretty runny so you can dab
it on with
a soft brush over the zip textured soil without too much disturbing the
texture. For
all but the finest lawns, don’t cover the “dirt”
completely. Leave little
patches of earth dry so they will show through later – just
little bare a patch
here and there for meadows and fields – much large bare spots for
forest floor
etc. There are many brands and colors of fine ground foam available,
and you
have to experiment a little to find what works for you. For a meadow, I
generally sprinkle on a rough covering of a nice bright spring green,
and then
dull this down by sprinkling over a lighter and spottier coat of a dull
burnt
green. Then I add a few patchs of tan or even yellow here and there.
For forest floor,
a few
patches of various greens, some earth colors, and some fine pine
needles, and
then a few low clumps of under brush and vines etc.

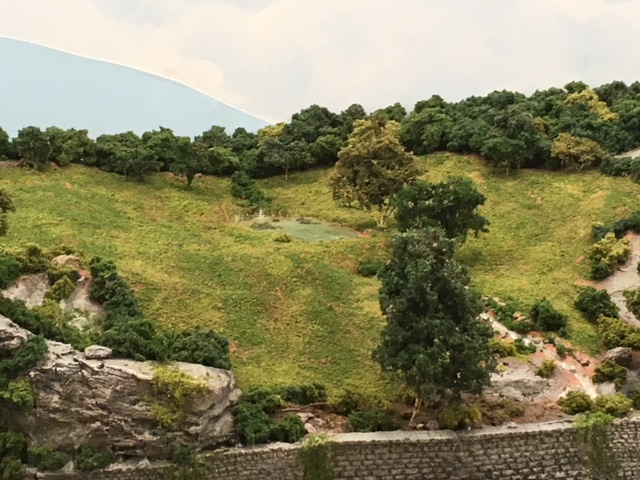
In
the final
step, I lightly color dirty patches and patches of lichen on the rocks.
Using pastel
sticks (a light tan, a red-brown, and some light green for the moss) I
draw light
lines of color on the rock and then rub and smear this evenly over to
create small,
very light patches of color on the rock face. (See below.) Then I apply
some nice
“viney” greenery
to the rocks using “leaf flakes” or pulled apart stretches
of silflor or other stretchy
green net-like material held in place with contact cement. It is good
idea to
get a Scenic Express catalogue. It is full of
ideas
and illustrations, and from this you can see the dazzling array of
products
available. Finally I add the trees – usually
several different kinds and
colors. If you are careful about placement and sizing, you can
use
trees fashioned
from clump foliage right along with the more detailed trees made with
“Super Tree”
material from Scenic Express. Before you begin "planting" your trees,
place any
structures on the
scene to
help you visualized the scale, and then, since we are forcing the
perspective
in this case, carefully install the sized trees starting with the very
small
trees along the tree line in the back and working forward to very large
trees in
the foreground where things are full scale. I generally first
temporarily
place a
few trees of each size around just to make sure that the sizing is
creating
the
proper illusion of distance. You will find that the placement of the
larger,
near trees is critical to the illusion of distance, so experiment. I
general lightly
spray paint trees to bring out highlights (a little short of yellow for
larger,
brighter, near trees - a little shot of gray to distance the
smaller trees in the background).