

|
Here's the general concept. |
|
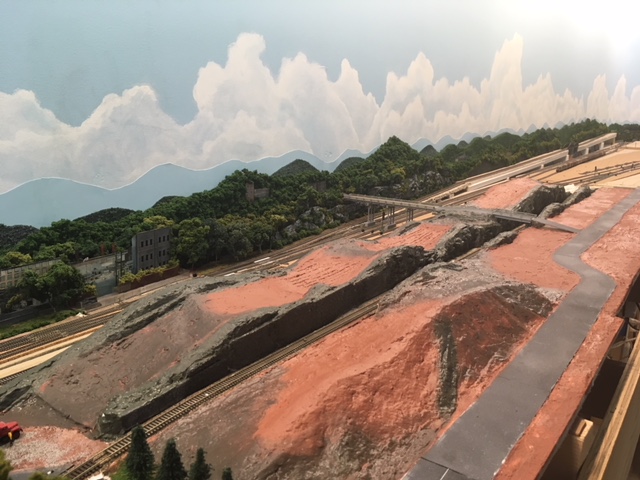
Here is the the crossing scene with the far mountain ridge line installed. |
|
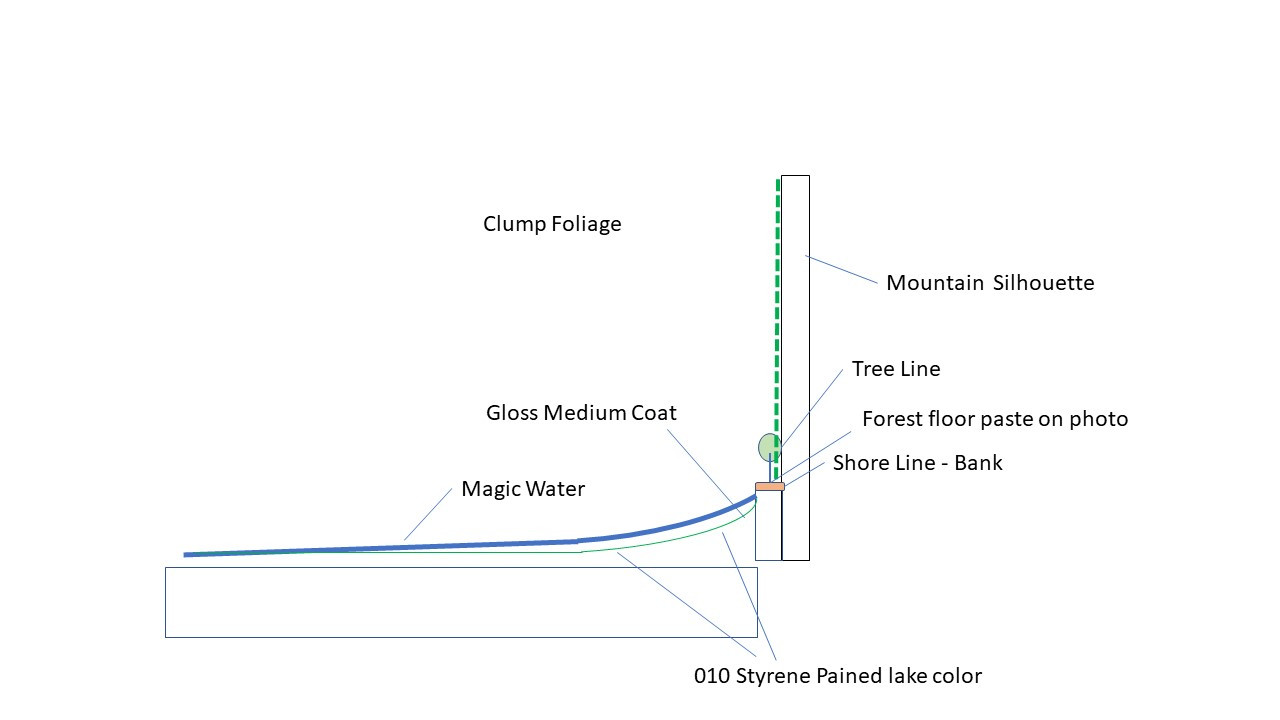
Here the backdrop silhouette work is completed and the rock sides of the lake glued in place. The near shore will be a marshy area at the bottom of a steep slope down from the rounded homasote cutout above. I can now remove the .040 styrene sheet, paint my lake on it, detail the shoreline and lake bottom, seal the enclosure with gloss medium, and pour the Magic Water. Then I'll replace the finished lake in a single piece, glue it down, and tie in the marshy part of the near shore line to the adjoining terrain using trees, rocks, foliage, and ground cover etc. |
|
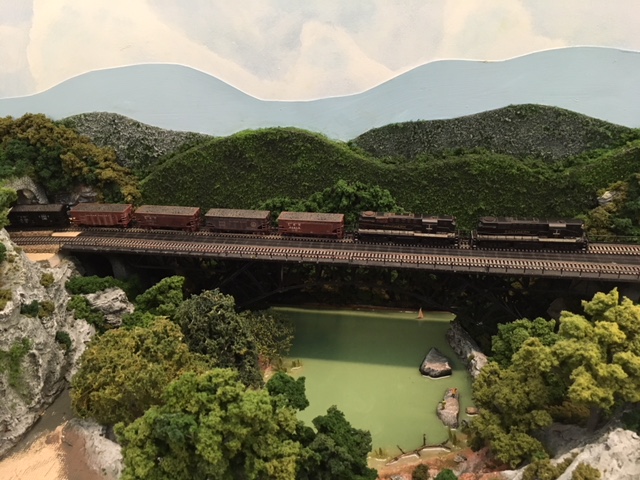
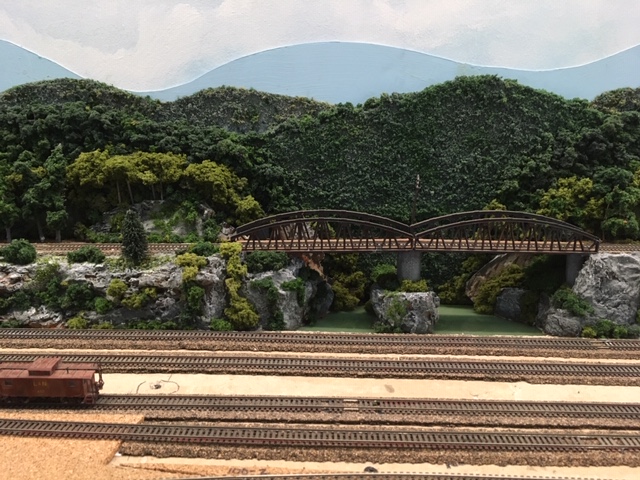
Here is the completed scene. As it turns out, the shadow of the bridge on the lake helps to add depth, and so does the juxtaposition of the two fishermen and the small sailboat. If I had it to do over again, I would make the large triangular rock a bit smaller than the one the fishermen are standing on. |
 |
Here is the mountain with the rock, walls, and track masked off and the texture applied. In this photo the plaster is still wet. It will dry a much lighter color. In this case I got the red earth mix a little on the purple side, but it doesn't matter. I'll go back over it with thinned latex paint color wash using my basic red-earth color to adjust the color once it dries and sets up hard. Once set, you can quickly but lightly over-wash this stuff with thinned paint to correct color and then with thinned glue (either white or matte medium) to attach ground cover. But you must be very careful - just lightly dab the fluids on - don't use forceful brush strokes or you will smooth out the grainy texture, and don't spray because you'll want to leave a few spots uncovered so some earth shows through here and there. It's a great effect.. |
 |
Here is the finished earth texturing, ready for ground cover. |
 |
And here is the mountain with the basic ground cover applied. I like the Woodland Scenics fine turf and mixed turf products for this: first fine turf in a medium green, then a dusting of green blend (a WS mix of fine turf made from a variety of greens) and then a few spots of burnt grass and yellow colored fine turf for variety. The forest floor sections, covering the dark-brown-earth painted areas, is made using two shades, soil or earth colored WS fine turf, with a sprinkling of fine turf in a burnt green and then a sprinkling of course turf in a light green. I have left the road uncovered allowing the textured red earth to show, and I sprinkled on a little ballast to simulate gravel. Then, liberally using contact cement, I added the tree line where the mountain meets the wall. Notice I use larger clumps on the lower slopes and diminish the size of the clumps as I ascend to the top where I have a thick forest covering the summit. At this point things are beginning to take shape, and the forced perspective effect is clearly beginning to work. |
 |
Now I add bushes and shrubs and vines to the rock outcroppings, again using plenty of contact cement and Woodland Scenics Clump Foliage in three colors and WS Foliage to simulate creeping vines on the rock faces: large clumps in the foreground and generally smaller clumps of foliage as I go up the slopes. At this point, I will also add a little more color to the rocks using pastels and washes to emulate mosses, and lichens, and dirty spots. Notice the variations in the grass color and bare earth patches I have allowed to show through here and there. I have also added a few loose rocks, thickets, and a few fallen trees to the forest floor areas in perpetration for adding my trees. |
 |
Trees: I like to use a variety of tree types in a variety of
green shades. Here I'll be using trees salvaged from the A&BR1, so
each tree will have to be refurbished with foliage and paint. Before I
add my trees, I like to install a
few strategically-placed trees to help me execute the
forced perspective. These represent the largest trees and
shrubs in any given area, and I can use them as a guide to size
the surrounding trees and other greenery. Also, although I did
not do it here, I often give the
smallest and most distant trees and shrubs just a hint of gray
over-spray to add to the illusion of distance. Here's the mountain completed. I placed and landscaped two structures (N scale for the house in the foreground and Z scale for the more distant house in the upper right on the horizon). Finally, I added a vehicle, a few figures, and some cows |
 |
Looking up this mountain meadow gives a good idea of the effectiveness of my forced perspective.Every thing gets smaller and less distinct as the eye move up the hill. Note the cows in two sizes - the cows in the distance are goats painted to look like cows. |
 |
Model railroading can be a dusty business. While the the adjacent scenery is under construction I'll cover my completed work with this very thin plastic sheeting. It is light enough to rest on the tree tops without damage. |
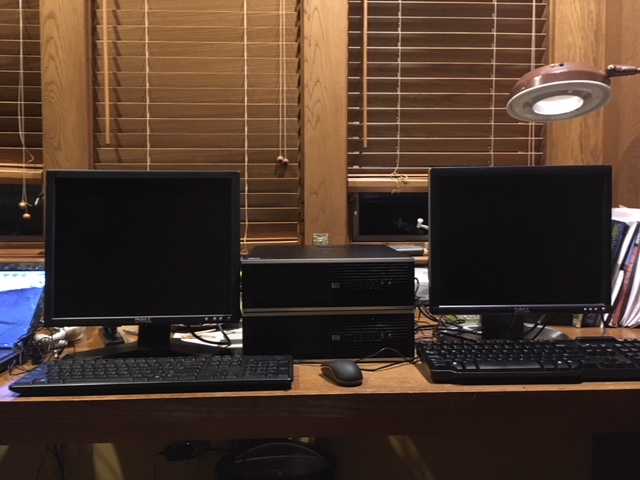 |
Two refurbished HP desktops: 64 bit, 4 gig or RAM, 180 gig memory, 3.0gHz, with 8 serial ports, wifi, network port, 17 inch monitors, keyboard and mouse. Total cost delivered: $268! |
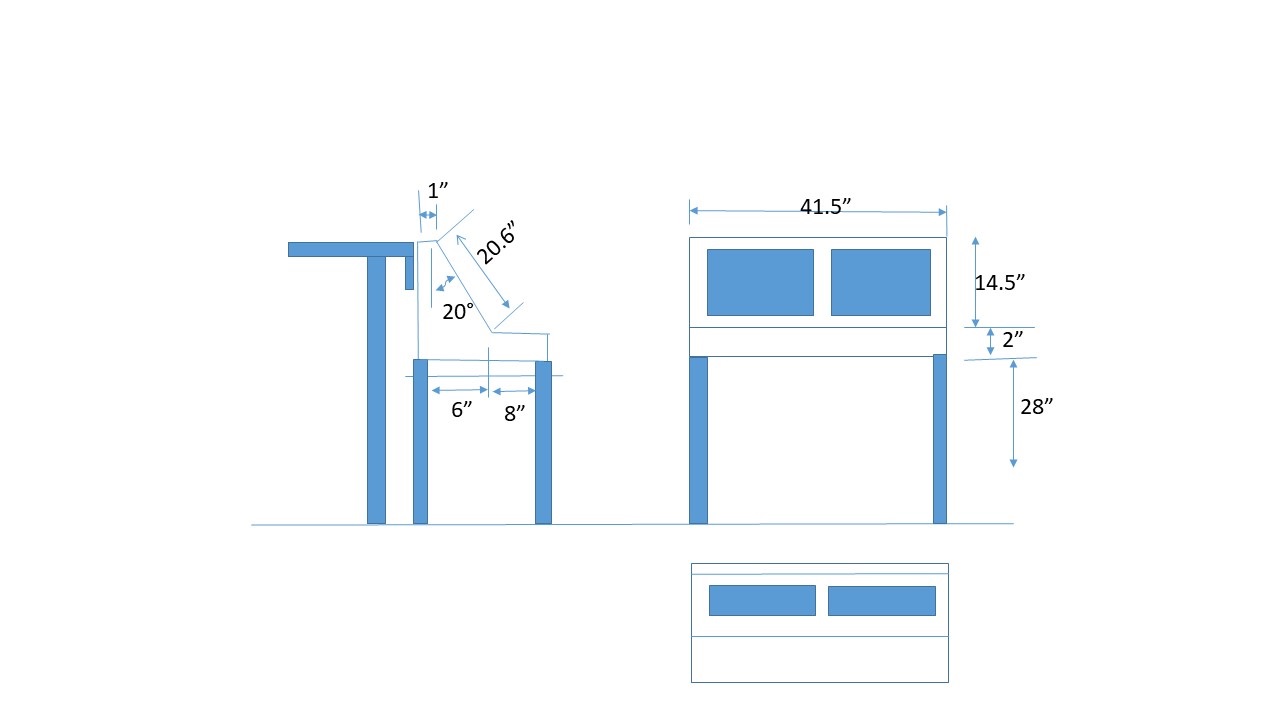 |
Here is a preliminary sketch of the proposed control desk that will house the monitors and keyboards. |
 |
Here is the area in question. I plan a
deep water lake along the back wall joining the wall about 1/2 inch up
and resting on the homasote strips I have installed just beneath the
styrene strip with the tree line photo on it. There will be a deep
water inlet (cove) beneath the two crossing bridges and terminating in
a
rock face around the cork area in the lower right corner of the photo,
and I plan another shallow swampy wetland cove under the wooden tressel
terminating
near the edge of the plywood to the left-center of the photo. The plan is to layout the water feature in place on four sections of .040 styrene, taking care that they join with nice straight edges. Then I'll mark the outline of the lake and the exact joint locations, remove the sections, place them on a flat bench, tape them back in place and then glue them carefully together using plastic cement to form a single piece. Next, I'll glue a .080 styrene barrier along the long back edge where it will join to the wall using thin plastic model cement. And then I'll create the shoreline by molding about 1/4+ inch high Sculptamold barrier all the way around. When the Sculptamold is dry, I'll seal everything up well (the barrier strip, the homasote shoreline and the sheet styrene joints) using thick gloss medium. Then I'll paint the lake bottom, detail the lake bottom around the shore, and pour my Magic Water. Finally, I'll use a very sharp razor knife to cut the sections apart again. and reinstall them in place on the layout. I have taken care to make sure that the cuts will be masked from the viewer's eye by the bridges and the roadbed causeway, and if I am careful making my cuts they will be pretty much invisible anyway. I tried this last week on a little test lake I made when I first began to experiment with Magic Water. I could detect a fine line where the Magic Water was cut, but it was subtle indeed. |
 |
Here are the four .040 styrene sheets in place. Note: I have left about 1/8" clearance under the tressel pilings. |
 |
Here the styrene pieces are removed and reassembled on a flat place on the bench top. |
 |
And here they are glued back together and a .080 square strip of styrene barrier added along the back edge (it does not show up in this photo,) and with the low Sculptamold shoreline molded all around. |
 |
Now the whole thing is sealed with
gloss medium with extra attention to sealing the sheet styrene joints.
It
is then painted with flat latex paint in two shades of green: a
deep green
for deep water and a lighter, dustier green for the shallows.
(The color gradations do not show up in the photo, and they are indeed
subtle, but still, they are clear
to the eye.) Then the shoreline in-water and
underwater detail (rocks, dead trees, gravel, some in-water plant life
in the swamp etc.) is added and, after careful mixing, the Magic
Water is poured. This
took nearly 48 hrs to fully dry. I calculated the area of the lake (~308 sq inches) and since I know 18 oz of Magic Water will cover ~244 square inches .125 inch deep. I calculate 12 oz will cover my 308 square inch to a depth of about .074 inches.That's a bit over a 1/16 of an inch. Remember I have a .080 strip styrene barrier in the back, so 12 oz ought to be about right. I just need to make sure the entire thing is super level. Notice I have surrounded the thing with .040 sheets of styrene, which I can use as shims should there be low spots that want to overflow after the pour. This stuff stays liquid for hours, so making these kinds of adjustments, if need, is easy. |
 |
Finished lake and wetland. |
 |
Another view. |
 |
Here is the completed frame with tunnel
portals and highway roadbed in place and little shelves for rock faces
running just
above the
base and near the rocky summit. In between, there will be a large,
relatively flat, undulating mountain pasture, and two level pads: the
lager pad
for a z scale barn, silo, and farmhouse; and the smaller closer
pad for an N Scale aluminum grain storage silo - again I'm
working to
force the perspective, and I hope to make the very top of this mountain
appear very distant indeed. Most of the town
of Westridge will be built on the hatch-top, which will cover the void
on the right in this photo. One of the things I like to do while roughing out a large scene is to place any structures on the surfaces I am preparing for them to see if everything fits and looks in scale and convincing. In this case when I placed the house, barn, and silo on the pad I had prepared for them, they seemed a little crowded, so I added another separate pad for the house a little higher up the slope. You can see it in the following photo. |
 |
Rock faces screwed or glued in place, plastic screen "skin"
installed, highway surfaces installed, homasote modeling in process.
Notice the narrow strip of styrene running along the slope from the
highway up to the farm pads. This will supply a level base for a
little
gravel/dirt farm road and I can model in a little cut and fill as I
apply the Sculptamold. Again the forced perspective is already
beginning
to work. |
 |
Initial base paint job |
 |
Plaster/tempera ground texture applied and over-wash earth tone paint applied- ground cover applied, and rocks dry-brushed with light gray and then very lightly with white. |
 |
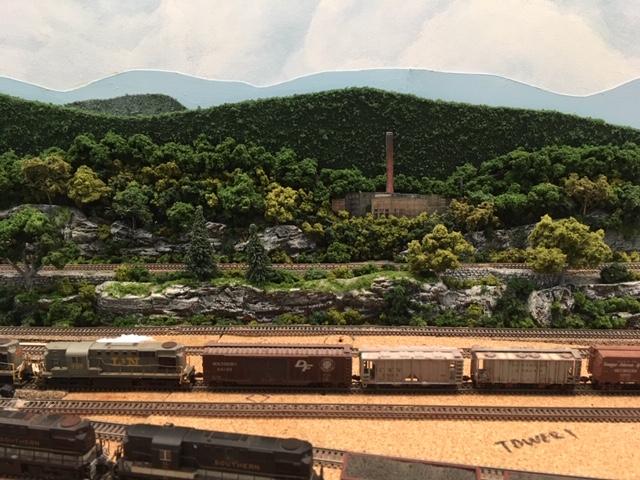
Shrubs and trees installed to complete my second mountain scene. |
 |
Closeup detail. |
 |
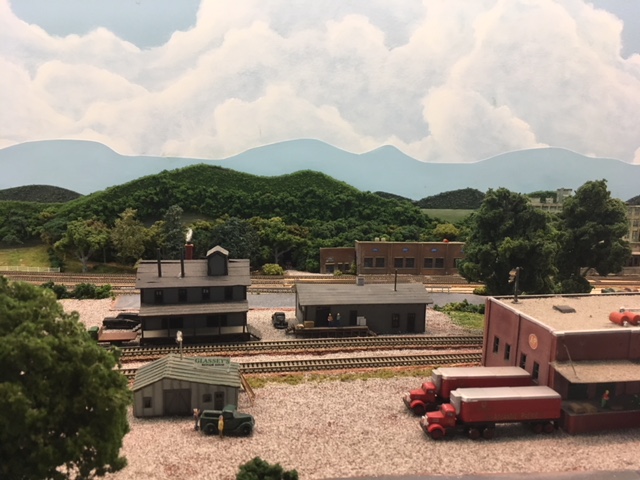
Here the hatch cover has been replaced and the town of Westridge as been laid out on the flat surface. I plan to put a low hill in the back left corner by the church to accommodate a cemetery. This will help to break up the uniform flatness of the town terrace. There will be a little grassy space with trees beside the hotel on the left and a near wooded strip behind that beside the road leading up the mountain and in front on the large rock escarpment farther back. This tree line along the left side of the town scene should soften the now-abrupt transition to the mountain scene and break up the expanse of the large rock face. |
 |
Here .040 styrene strips have been cut from sheets and covered with 220 grid sand paper and spray painted dark k gray with a final spray dusting of black and then a very light gray mist to form streets, which are then glued in place with a thin coat of Liquid Nails. Sidewalks are then installed along the streets. I use Liquid Nails to glue the sand paper covering to the the styrene and to glue down the street strips and sidewalks because it is stronger than white glue and will not warp the styrene like so many other adhesives. |
 |
The next move was to mark the location of the streets and sidewalks, remove all the structures, and glue the sidewalks to the the streets and then glue the streets in place on the homasote. Then I used dry transfers to make street center lines and other street painted markings like parking spaces etc. Then I laid out the small hill for the church and cemetery, filled in all of the unpaved areas with Sculptamold, texturing, and ground cover, and added shrubs, trees, vehicles, figures and other details. Not much left to do here except to ballast the track, construct two more sections of the depot platform, and install LED lights in all the structures. Remember.his entire town is built on a hatch cover so I will glue all structures and vehicles etc. in place after everything is complete. |
 |
Here is the underside of the hatch with seven 4 bulb series circuits attached to 12 volt feeder bus terminals.Structure lighting on the A&BR2 is accomplished using warm white LEDs powered by the switchable 12 volt supply circuit. LEDs are wired 4 bulbs in series with a 680 ohm resistor. There are a few remote structures that will be lit with the same LEDs, but with individual bulbs wired in parallel using the switchable 5 volt supply circuit, each of these solo bulbs gets a 1000 ohm resistor. |
 |
Here is a night photo. The switchable supply circuits are
turned on and off using relays triggered by a DS64 switch machine set
in the slow motion mode, and wired using a zenor diode to convert the
polarity reversing output to an on/off output. Thus, all
structure lighting can be controlled and fully automated by
TrainController. |
 |
Overview of Westridge looking down from the West Rridge across the rooftops of the town and the lake below to East River Mountain in the background |
 |
Westridge town grid with a view of the exposed rock face of the West Ridge on the left. |
 |
Here is the topo and street preparation
for the
right hand half of the town of East River including my rough in forms
for the two hillocks, homasote ramps for
major roadway elevation changes and the road and street layout
complete with .040 styrene sheets. I have also roughed the main
retaining
walls and the tunnel portals. Next the streets will be completed and glued down and the street lines added (see the following entry dated 6-18-2018,) The rock face and heavy retaining walls must be installed and painted and detailed, and the screen, Sculptamold and ground cover will follow. I also have to install the sidewalks and all the LEDs for the structure lighting and put the structures in place. I must also complete the church grounds to the left of the town including the creation of the cemetery. |
 |
Dry transfer problem, |
 |
Ratty lines repaired with
1/64 inch Art tape. Perhaps 1/32 inch would be even better (that's
about 5 inches or so). The Art Tape covered up the problem to my
satisfaction. This repair is not perfect, but it is not so bad as
to warrant repainting the streets. In general, I think the Art Tape is a far better technique. It gives a cleaner result than even my best dry transfer efforts. It is also much less expensive. The only problem is that it does not readily stick to the sand paper grit road surfaces, and in order to get it to stick, I have to work with a small brush and some liquid Testors dull coat. As with the dry transfers, the dull coat is necessary to form the final bonding coat anyway, so this is not really much of a a problem. Once I got the hang of it, it went much faster than applying the dry trasnsfers and it was easier to line up and adjust. I plan to keep both 1/64 and 1/32 inch Art Tape on hand in white and yellow. |
 |
Here, the East River main streets with road markings and sidewalks have been completed along with all the retaining walls and rock faces, and all ground cover except track ballast. Now some trees and landscaping, some telephone poles, a few more figures and vehicles and other details to the complete the scene. |
 |
East River Completed |
 |
Another View Notice I have yet to complete the scenery along the front edge of the bench. I will do that after I have ballasted the track so I don't have to work over the top of finished trees etc when I do the ballasting later on. |
 |
Right - Rough in of a low ridge with cuts extending out from the backdrop. Left- Rough in of house lots with small meadow rough in behind. |
 |
East River Valley: Scene near completion, |
 |
Here is my rough sketch, Kind of cryptic, I know, but just drawing this helped me to sort out my thoughts and address all the planning issues required. It will make a little more sense when you examine the rough-in photo below. |
 |
Little River Ccurve rough-in with homasote forms, screen, and roughed-in rock walls. The two double-track main lines begin in a single wide cut on the right and then diverge into two cuts in the next mountain on the East bench. The mountain side behind the high rock cut wall is very steep. The placement of the the tree-line will be critical. It will probably be best to place it pretty low on the mountainside. I may experiment with a homosote strip to carry a forest floor photo and to raise the height of the trees on the near edge of the forest at this tree line similar to the way I handled the forest floor photos on the back drop. |
 |
The idea for the pond came from a
natural low spot in the meadow topography about 3/4 of the way up the
slope. I did not plan it, but just looking at the contour of the
hillside made me think small pond. There is a natural place for a dam,
and a deep ravine for the stream to run down the mountain, under the
retaining wall and the track in a culvert, and spill into a another little ravine
between the two sets of mainline tracks. From there, it will empty into
the lake at Little River via a small waterfall. In the photo on the left, you can see I have spread sculptamold on the screen leaving the pond and stream position open so I can tie it in after I create, pour, and position the pond and the stream. Once these are in place, I can fashion the the dam and tie it all together with sculptamold. |
 |
Here is the pond bed and the stream bed ready for painting, sealing, detailning, and the pour of the Magic Water. |
 |
Here the pond and stream forms are roughly placed in position to check the fit and the elevations. |
 |
I like to pour the Magic Water on to a flat form made from
.040 styrene sheeting cut to size. I make banks using sculptamold and I use
1/8 inch square styrene strips to make barriers glued to the styrene to form a reservoir for the Magic
Water pour. This way I can make the pour on a perfectly flat and
level surface. This means that these forms have to be sealed,
painted, and detailed with anything that will be in or below the water
so I can make the pour around or over it. Here, I have painted the
bottom of the pond and the stream and the banks of both as well; and I
have glued in a few rocks in the stream and in the pond and some reed and a fallen trees
in the pond using gloss matte medium as glue. Then I made the pour,
let it dry, and finally I constructed the dam and tied the
water forms into the scene using sculpatmold. Since I am again forcing the perspective here, the stream feeding the head of the pond will be quite small, so I can just cut it into the sculptamold and make any water effects I need using gloss medium or my Woodland Scenics' water effects gel. |
 |
Here is the entire Little River Curve ready for the initial paint coat.Notice I have used a sharpy to rough in the location of the distant tree line and the location of the forests (xxx). |
 |
Here is the completed initial paint coat (dark grey rocks,
red/brown meadow or orchard soil, brown near forest floor, and
black distant forest floor.) Looking at this photo, I realize I have made a mistake. My plan was to have the main highway, which one can see on the left in the photo running along the edge of the East bench, come up and around the curve and continue on along the edge on the South bench. I will have to cut a little of the edge of the near hill away, install the rounded corner, and rough this in. The finished bench will have a one foot radius in what is now a right angle corner, so there will be plenty of room for the roadway grade and curve. |
 |
Here is the repair with top radius installed , the corrected highway, and a stone cut roughed in. Notice I have completed the carpentry for the corner radius.here. The one foot radius with vertical posts will allow me to bring the black Formica fascia finish smoothly around the corners and give me something to glue it to on the curved sections. All the interior bench corners will be rounded like this, and the exterior corners will get a similar treatment to allow the Formica to round exterior corners and be securely glued down. |
 |
Next I added the ground "zip" texture, a second washy coat of earth colored paint to correct the color, the ground cover, and some shrubs and trees. Here is a view of the high meadow with the pond and stream. Again. I forced the perspective across the meadow, and as a result, the distant tree line is very convincing indeed. I also installed a low near mountain shilouette in front of the large blue mountain, which is not shown here. |
 |
Here is the finished Little River Curve section (viewed from the North) |
 |
Here is the finished Little River Curve section with the fruit orchard in the foreground (viewed from the South) |
 |
Styrene sheet lake bed with bank
and barrier. Notice the calculations for the amount of Magic Water
needed in pencil on the lake bed floor. one package on Magic Water will cover 2 sq ft (288 sq in) to a depth of 1/8 inch, so: if sq in of the lake bed is ~200) / sq in per package (288) = x (oz need for lake bed) / oz per package (18) x = (288 x 18)/200 x = 12.5 I'm using an 1/8 in barrier strip, and I don't want it a full 1/8 inch deep, so: for 3/32 inch deep (that is 3/4 of 1/8 inch) 12.5 x 3/4 = 9.3 oz So I'll mix 10 oz. - 6.6 of bottle A and 3.3 of bottle B. |
q i |
Lake floor and banks painted and detailed ready to pour Magic Water. |
 |
Lake in place after the pour and a 48 hour drying period. Ready for rock walls and ground cover and landscaping etc. |
 |
Almost finished scene. This little finger of a larger lake is just the end of a small cove. Notice that a section of the main lake is visible beyond the near backdrop mountain. I am pleased with the slightly muddy color variation in the water as it transitions ffrom the near shallows to deeper water. |
 |
Here is a view of the cove looking under the bridges. I am very pleased with the forced perspective, the illusion that the cove opens into a larger body of water, and the look of the far shore line. |
 |
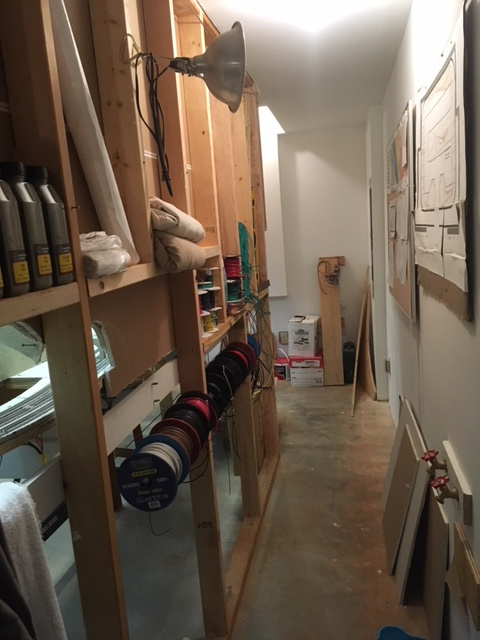
New storage shelves behind the backdrop
wall. These well labeled shelves contain all my electronic parts
and spares; spare locos and rolling stock and associated spare parts, unbuilt structure kits and kit parts, styrene
sheets, figures, vehicles, and all my detail parts. All of my scenery building materials, foliage, ground cover, rock molds, sculptamold, etc is stored in boxes under the bench along with boxes of all of the stuff I salvaged from the A&BR1, |
 |
Wire storage area behind the backdrop wall |
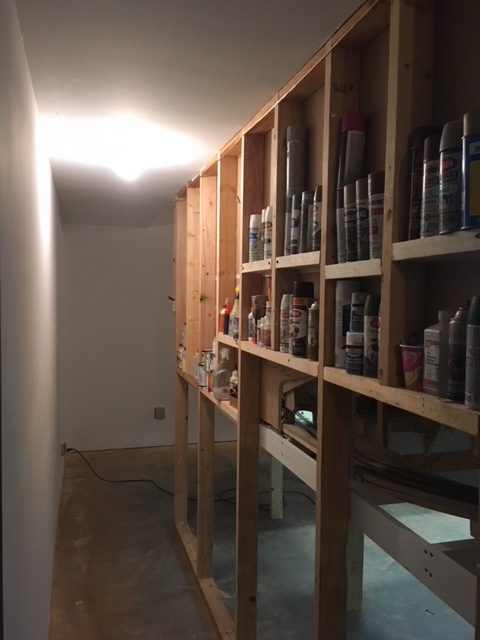 |
Paint, glue, etc storage behind the backdrop wall. |
 |
Clean train room. Whew! |
 |
A rough layout of structures, track and highway. |
 |
Homasote installed. track laid, and roads etc. in place. |
 |
Here are two buildings with LED lights installed: two 5mm warn white LEDs in each building. Note the " leaks" around the base. I'll dealk with that later. |
 |
Here are the associated LEDs and the resistor for the 12 volt circuit. Note the labels that correspond to the Little Rive Liayout Lighting Barrier Block, and the indication of the leg that has the resistor (#12) in this case. This circuit worked with no resistor, but it was a bit too bright, and after a little testing, one 680 ohm resistor in parrell with four bulbs did the trick. |
 |
Here are the layout lights barrier blocks for the little River Industiaon Section mounted on the wire mounting board: one block for the positve (blue) side and one for the negative (geen) side. Note that there are 16 LEDS in all, four groups of four LEDs. The groups are wired in parallel with four bulbs in each group wired in series with a 680 ohm resistor. Unlike the DS64 switch machines, which are also powered by the 12 volt supply (brown/white), the layourt lights are on a switichable (brown/white/black tape) on/off circuit that employs a relay triggered by a DS64 output. So I can turn them on and off using TrainControler. |
 |
Mounting Board labels and
labels for the new BDL 168 and revised labels for the PM42s to reflect
the addition of three more power districts to include 8 more track
blocks and the 2 auto-reversing Sections. |
 |
Here is the new BDL 168 with its mounting board and interface. This will supply block detection for 8 tracks of the yard ladder and for the two auto-reversing sections, the Yard Traverse and the Terminal Traverse. |
 |
Here is a photo of three of these pvc supports installed . In this case the fourth corner of the rigid foam sheet will rest directly on the mountaintop. |
 |
Here is the same section with the rigid cover in place. Note the cover here has not yet been cut to match the bench below, and the side curtains have yet to be attached. |
 |
Here are two sections of the finished new dust cover in place with a bridging sheet between.
|
 |
Here is the flat worker housing area with the bridge and roadway installed and the rock face cut wall completed. |
 |
Here is a closer look at the detail of the rock cut forced perspective. I am pretty happy with the illusion of depth achieved here, but what does not show up well in the photo is the flat cutout of a road disappearing iinto a forest at the end of the 3D road beyond the bridge. I think it needs to be lighter in color, so I'll do this in PhotoShop and reprint it. to size. |
 |
Mainlines, siding, and roadway all cut through low rolling hills with crossing and flat terrace for worker housing beyond. Here the walls and rock face are in place, the sculptamold complete and the base coat of paint applied. After I ballast all the track in the cuts, I'll work on the ground texture and gorund cover, foliage and trees in the long nnarrow strip between the cuts. Then I'll start on the housing sturctures, which will go in the flat area in the upper right of this photo along both sides of the roadway. |
 |
Here is the track ready for ballasting. |
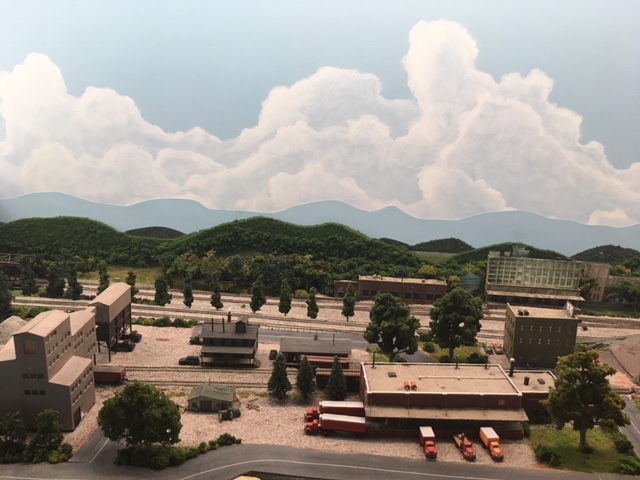 |
Here is the completed industrail area with the ballasted track behind. |
 |
While I was at it, I ballasted the track on the industrail spur and siding. |
 |
Here is the completed ballastng.I have only to finish the
retaining wall on the right and add a few details (weeds, coal spills,
etc.) Now I can begin working on the strip of rolling hills between the cut in the center of this photo. |
 |
Here is one of the garden plots and the newly added raised, gravel road. |
 |
And on the other side of the crossing roadway, a grassy field |
 |
Here is the entire completed strip of rolling hills with the railway cut on either side. |
 |
These little Blair Line and Laser Art kits each take a few hours to build. I have been away, but now that I am back, I will try to build one a day, and then move on with the layout of the area by the middle of next week. |
 |
I have completed enough of the kits now to lay things out. Here is the placement for the structures for the worker housing area. I can now install the lights, add the ground texture and ground cover, scrubs and trees and detail the scene. |
 |
Nearly completed worker housing area. |
 |
Completed worker housing area - night view, I'll go through and black out some of these windows with black tape and add some shades with thin light tan masking tape. |
|
Rolling hills and worker housing area on Sept 20th. |
 |
Near completion - October 30. |
 |
The first orders of business are to lay track and wire up all the turnouts. Here are all the track sections weathered and wired up with droppers and connectors ready for installation. Notice I have not only already installed all the turnouts for the ladder and the run-arounds, I have also installed almost all the 1/8 inch cork underlayment and penciled in all the track centerlines. |
 |
Here is the completed track laying roughly tacked in place, but not glued down. At this point I have also installed, wired, and programmed all the DS-64 stationary decoders for turnout control, wired all the yard blocks with block detection, and progremmed stop points, sound location, and speed limits in each block. The next move is to do some extensive testing. To do this I have created some temporary yard testing schedules in Traincontroller to automatically run all my trains over all of the track in the yard. When I am sure that everytings is in pefect alignment, I will glrue down the track, insert sleepers ti fill the voids where the track joiners are, and finish the dwarf signals for the ladder. |
 |
The long grade against the wall before appling scenery. |
 |
Here is the rough-in for the rock faces and retaining walls alone the back of the South Bench. Next I'll tie all these piecs together with sculptamold and then paint, texture, and landscale. |
 |
Here is the nearly finished strip. Most of the forced perspective here is accomplished in the last inch or so along the wall using thin, but nonetheless three deminsional, rock face cuts with small trees lining the top of the cliff, and a few forest floor photographs pasted to the near shilouettes under the foliage canopy for depth. In this case, most of the illusion of depth is accomplished by using larger clumps of foliage to articulate the near edge of the tree canopy in contrast the the smaller clumps and the finer textured foliage material behind. A sparse row of slightly larger trees is then added to the top of the rock face on the bench side of the high line track. |
 |
 |
 |
 |
 |
 |
 |
Here is the yard schematic from TrainController as it appeared in 2015. The current version has different block turnout numbers, but the design has not changed. |
 |
Structure placement and rough-in the topography, roadway, and paved areas at the East end of Altamont Yard. |
 |
Sculptamold, paint, texture, and ground cover for roadway cut at the East end of Altamont Yard. I'll not add trees until I ballast the yard entrance track behind this scene. I have painted the flat between the yard entrance tracks my earth color to allow a little earth to show through here and there. Now I'll add the intra-yard roadway and then ballast, |
| Offending "squared off" 1/2 inch homasote mountain silhouette. | |
| Corrected silhouette. |
 |
Watercolor technique in the online video. The artist here uses a very thin, washy, blue-grayn applied very wet with a brush, and then he pulls the color down and softens it with a fine water spray bottle and blots it with a tissue. What he is doing here is putting the mountain tops in the clouds. What I need to do is just soften the moutain silhouetes by adding some misty color variation, |
|
Silhouettes before. The trick here is to get the same effect on the hard laxtex painted styrene that the above artist gets on soft, absorbent, watercolor paper. |
 |
This really did not work so well. Painting on the hard surface caused the water mist to run uncontrolably. I tried to soften the result with some latex gray dry brushing, but the results were not good. |
 |
Atfter some experimentation, I was able to get a passable result by dry brushing the silhouettes with layers of dark gray and green latext wall paint. Notice on the right, I have also experimented with a tiny tree line, which I think will work, I did this in black with a sharp felt tip marker. I need a dark gray and an olive green marker, |
 |
The question is, is this better than the solid blue? The dry brushed mountains look closer are more realistic, but they may still reflect my lack of painting skill. |
 |
The old blue mountains look cleaner and more distant although much more styeilized. It think this is better, so I'll repaint the dry brushed mountains light blue and keep what I had to begin with and end this wild goose chase. |
 |
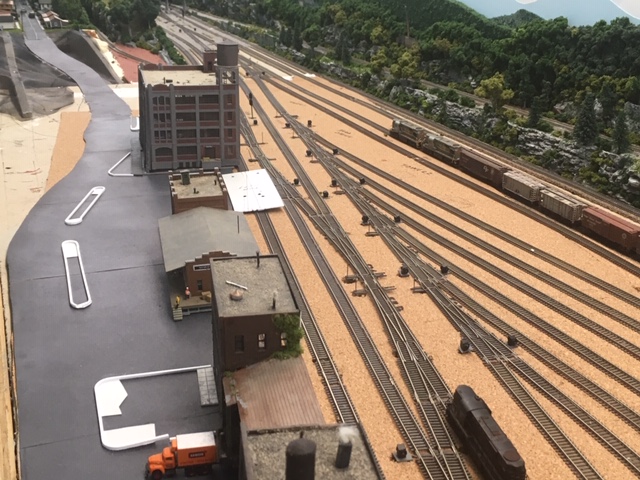
Ready to ballast. Here are most of the two inter-yard paved roadways and the entire yard painted my basic earth color so a little dirt can show through in spots where the ballast is thin. The plywood on the right will support a low hill, which the far road will ascend leading to a flat spot a the summit where the Southern Railway HQ building and a large shop will overlook the yard below. At the far end of the paved road on the right, I plan to place the yard office, a small yard entrance tower, and the main yard control tower along with a few small sheds etc. The wider paved strip on the left will get a line of small freight houses, and the short axillary track, which dead ends into the plywood section will get two through-track repair shops. |
 |
I have completed the first section of ballast, including
all the track behind the forested area along the road coming down
from the workers housing section. Now I can add trees to that
forest while I am waiting for the additional ballast I ordered to arrive.
I can also detail and install the three large track-side buildings
beside the south siding along with their interior lights. But
before I start with landscaping and structure modification, I will
clean and test all the newly ballasted track. I strongly suggest that
ballasting be done in reasonably small sections, and that each
section be throughly cleaned and tested before moving on the the
next. After each cleaning, I re-treat the clean track with and thin
application of NoOx Special A (wonderful stuff), and then I wipe it clean again. Here is a view to the west showing the roadside forests and adjacent refurbished buildings in the background with yard towers beside the lead and the newly ballasted and cleaned track area behind. |
 |
Here is the same section looking eastward. Now,on with the ballasting. |
 |
With the mainline track next to the backdrop wall and a good portion of the yard ballasted, I can begin on the small hill at the west end of the yard. Here I have roughed in the terracing and the roadway, and positioned the two through-track train shops as well as the yard office, the large shop building on the hill, and the division headquarters building behind that, |
 |
Here is closer view of the rough-in. Now, I'll finish the roadway and the ground cover, and install the retaining walls, landscaping and the rock cliffs. Then, I'll complete the ballasting. |
 |
Here is the yard ballast complete and the finished low hill at the west end of the yard with through-track shop. the yard office, the large shop, and the division headquarters surrounded by some trees and landscaping. |
 |
I re-routed the main highway, fashioning a crossing grade to connect with the wide roadway that runs between the mainline track and the yard ladder. I'll add wooden planking between the rails and install and program a flashing crossing gate here. |
 |
Here is the other end of the highway disappearing into a tunnel through the retaining wall in the roughed-in curving ridge line that runs between the two sets of mainline tracks on the Altamont Curve. |
 |
Here is the scene with the Sculptamold applied.. |
 |
Here is the first, base coat of paint |
 |
Here is the finished
Altamont Curve. I haven't used many trees along the ridge because the
reach-over to access the track in the deep cut next to the back drop
wall is a long one, and a forest of delicate trees would defiantly make
cleaning and servicing track there difficult. Except for the two
service hatches, this is the most dificult spot on the layout to reach,
so Murphy's Law of Model Railroading tel me that I will undoubtedly experience the majority of my de-railments in
this cut. |
 |
2/15 Finished installing telephone poles along roadways and mainline track on the South bench. Here are five of the 50-plus poles on this long stretch of bench. |
 |
2/16 Ballasted track on the Little River Curve, and added a retaing wall along the creek bed between the mainline tracks. |
 |
2/17 Today I worked on the little creek that runs betwenn the two sets of mainline tracks on the Little River Curve. Also there was a lot of trackside and rock face landscaping to complete in this area, and I fashion the little water fall you see here using Woodland Scenics Water Effects and some cotton |
 |
2/19 Began ballasting on the East bench. |
 |
2/20-22 Ballasted the East River Depot area, mainlines and sidimgs, and installed a five section covered platfrom with LED lights, figures and other details. (This is the plaform I wired up a couple of years ago - see page 1 of this blog entry for 9/23/2016.) Five parallel 12 volt seitchable circuits each with 4 3mm white LEDs and a 6.8k resistor. |
 |
2/24-26 Completed the East River platform and installed landscaping around the depot and on the rock walls beside the main highway that runs along the right side of the front edge of the East bench. Added lights to the depot and labeled the East bench layout lighting distribution barrier blocks. |
 |
2/27 - 3/3 Completed finishing work on the East bench. Completed ballasting - added lines and landscaping to roadways north of the depot - detailed the crossong grade - added a few signes to retaing wall b the depot - worked on a few unfinshed structures in the town of East River - placed trees in the forested area on the front edge of the East bench near the Easrt River Curve - glued turf tree line along the top of the "squared off" mountain silhouettes on the East bench (see post of 12/16/18) |
| 3/4 Began ballasting on the East section of the South bench.. |